Widgets

Facebook Messenger for Windows / MAC / Linux Computer


Facebook Messenger has been a very useful mobile application. It enables us to chat with our Facebook friends without opening the Facebook application itself. Sending chat message to our friends is simple as texting.

Sending a message does not only limit to typing a text message. You can have a voice recording and send it as a voice message.


You can send pictures and videos from your gallery or take a photo/ video right there in the Messenger and send it right away. There are also a lot of wonderful and fun animated stickers (similar to emoticon) for you to choose from.


This great application has a lot of features aside from sending messages. You can create group chats with your friends. You can have free voice calls (WiFi calling) with your friends from around the world. And if you want to see the other person you’re talking to, you can make a video call with your friend.


All these features are Free to use as long as you have an Internet connection (data connection) on your mobile.


Messenger for PC
Facebook Messenger for PC / Laptop / Desktop Computers


If you frequently use a computer to go online, you can download and install an application to your computer to continue using Facebook Messenger.


With Facebook Messenger for Windows / OS X / Linux, you can now receive all your Facebook messages in your computer without the need of opening a Facebook page in your browser.


All features mentioned above when using Messenger mobile application version is also available to use in your computer. This is not an official application and not affiliated with Facebook but it is free to download, install and use this application. If you want to try this application, download links are available below.


Facebook Messenger for Windows


Download Facebook Messenger for MAC (OS X 10.7+)


Download Facebook Messenger for Linux


Widgets

How to Rescue Your Files When Windows Fails To Boot


Save Your Files
Save Files - image by MZtech


If our computer encountered a problem and couldn’t boot the Windows system, first thing we worry about is our important files, reports, documents, pictures, etc. that we haven’t made a backup on other storage like an external hard drive, USB storage device, or on online cloud drive.


Widgets

How To Download Windows 10 ISO File


How To Download And Save An ISO File Of Windows 10 Operating System


Windows 10 upgrade will automatically download in your computer's Windows update as soon as you confirm your upgrade reservation in Windows upgrade tool. It will be automatically erase from your computer as soon as the upgrade is done. So if you would like to save a Windows 10 installer file in your PC for future use (clean install, re-install, upgrade other PC, etc.), you need to download an ISO file of Windows 10 on your PC.

Windows Media Creation Tool
Windows Media Creation Tool, Windows 10 Download - image by MZtech

Steps on How to download Windows 10 ISO file:


  • After downloading the .exe file, run the application. On the selection "What do you want to do?", there are two choices: Upgrade this PC now and Create installation media for another PC. Select on the second option and click next.


Windows Media Creation Tool
Windows Media Creation Tool, select create installation
media for another PC - image by MZtech


Windows Media Creation Tool
Windows Media Creation Tool, select language,
edition, and architecture - image by MZtech
  • Select English for the Language. You have to choose which edition you would like to download. If you would upgrade Windows 7 Starter, Windows 7 Home Basic/Premium, then you have to download Windows 10 Home.
Windows 10 Home
Windows 10 Home N
Windows 10 Home Single Language
Windows 10 Pro
Windows 10 Pro N
 
 
On the architecture, you have to choose if it is for 32-bit (x86), 54-bit (x64), or both.
Windows Media Creation Tool
Windows Media Creation Tool, select file type - image by MZtech


  • You have to select what type of Windows 10 file you would like to download and click next.  
 
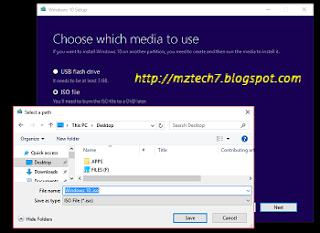
  • Choose where to save your file. You can rename it to easy identify your downloaded file then click save and next.
Windows Media Creation Tool
Windows Media Creation Tool, choose location where
to save download file - image by MZtech

  • Your Windows 10 .ISO file will start to download and it will take some time depending on your Internet speed. File size is approximately 2.5 GB-3.5 GB for single architecture and around 5.9 GB for dual architecture (combined x32-bit and x64-bit).
 
If you like my post and find it helpful, please hit like or share buttons. Have some questions? Feel free to post it on comments below and I'd be willing to help you out.


Widgets

How To Use Microsoft Office Applications


What are the different Microsoft Office Applications and How to use them?


Microsoft Office Logo
Microsoft Office - image by MZtech

There are 7 Applications included in Microsoft Office but only 3 of them are commonly used. The other 4 Applications are seldom used by consumers mainly because they didn't how to use it and where to use it for.

Microsoft Office Applications That Are Commonly Used:

Microsoft Word Logo
Microsoft Word
- Document and Word Processing Software.
- used to create different types of documents like Word Document (*.docx), PDF - Portable Document Format (*.pdf), webpage (*.html), single webpage (*.mhtml), Plain Text File (*.txt), Rich Text File (*.rtf), XPS and XML Document (*.xps, *.xml), etc.
- it used to make Reports, Letters, CVs, Resumes, Newsletters, Planners, Lesson Plans, Test Papers, Graphs, etc.
Microsoft Excel Logo
Microsoft Excel
- Spreadsheet Software.
- used to create documents like PDF - Portable Document Format (*.pdf), Excel Spreadsheet (*.xls), Comma-Separated Values - CSV (*.csv), Text Document (*.txt), Webpage (*.html), etc.
- It is commonly used to create Forms, Inventories, Expense Reports, Budget Reports, Memos, Time Sheets, Grade Sheets,  Schedules, Statements.
Microsoft PowerPoint Logo
Microsoft PowerPoint
- Slideshow Presentation Program Software.
- used to create files such as PowerPoint Presentation (*.pptx), Image Files (*.png, *.jpeg, *.gif, *.jpg, *.bmp), Windows Media Video (*wmv), PowerPoint XML Presentation (*.xml), XPS Document (*.xps), Portable Document Format (*.pdf).
- PowerPoint Application can be used to create Slide Show presentations, edit Graphics, create Photo Albums, create a Movie, create Quizzes, and make Animations.


Microsoft Office Applications That Are Rarely Used

Microsoft OneNote Logo
Microsoft OneNote


- is a computer program for free-form information information gathering and multi-user collaboration. It gathers users' notes (handwritten or typed), drawings, screen clippings and audio commentaries. Notes can be shared with other OneNote users over the Internet or a network. - source Wikipedia
Microsoft Outlook Logo
Microsoft Outlook

- is a Personal Information Manager Software.
- often used mainly as an email application, it also includes a calendar, task manager, contact manager, note taking, journal, and web browsing.
- Microsoft Outlook can be used to manage all your email accounts from different providers like Gmail and Yahoo mail in one place.
Microsoft Publisher Logo
Microsoft Publisher

- is an entry-level Publishing Application Software.
- it can be used to create / design Brochures, Business Cards, Banners, Post cards, Certificates, Flyers, Catalogs,  and many more.
Microsoft Access Logo
Microsoft Access

- Database Management System.
- it used to store / edit data that can be used with programs such as Microsoft SQL Server, Oracle, and Sybase.

 
If you have Microsoft Office installed in your Computer, you can find all these applications present. You don't need to download additional software applications to create certain files or documents because mostly it can be done with these applications.


Read On:

How To Use Print Screen in Windows 7 / 8/ 8.1 / 10

Use Snipping Tool To Capture Image On PC Screen

If you like my post, don't forget to click on like, +1, tweet, Pin, and share buttons. Have some questions you would like to ask, post it on the comments section below.


Widgets

Use Snipping Tool To Capture Image On PC Screen


Capture Portion Of Your PC Screen Without Downloading 3rd Party Apps

 
When we want to capture images, texts, or portions of our screen in our PC, we commonly download a free 3rd party applications to do it or install an extension on our browser to have this feature. Most of us do this when taking notes with illustrations or on websites that has disabled copy and paste option.

What many of us don't know is that, you need not to download any additional application or Internet browser extensions to be able to do it because it is already available in Windows System. I have been using computer for two decades now but I admit that I am one of the many users that didn't know about it.
 
There is actually a tool in Windows Operating system that we rarely use because we weren't aware of it. This tool is called Snipping Tool and can be found under Windows Accessories. We may have seen it there but we don't know what is for or how to use it.
Snipping Tool Icon
Snipping Tool - image by MZtech

Using this tool, you can capture an image (pictures, texts, illustrations) of your whole PC screen and webpages or just a portion of it and save it as an image. It is a very light application which has basic features perfect for note taking. Re sizing and adding texts on the image is not included in its features.
 
All you have to do is type on your search bar Snipping Tool or go to all files and open Windows Accessories Folder. When you see the application, double click on the icon to launch the application.
 
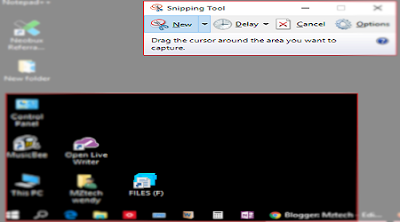
Click on New button and you will see a large white cross (+). Click and hold on that cross then drag it adjust which portion of the screen / page you want to capture.
 
Capture portion of screen in Snipping Tool - image by MZtech
 
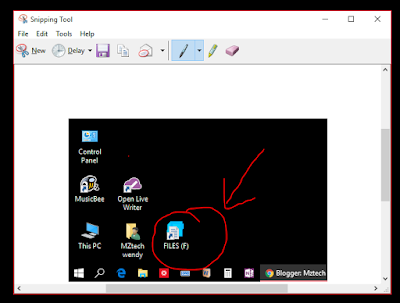
It will show you the image of your captured screen / area before saving it. This allows you to change the image if you don't like it by clicking the new button. You can even edit it by putting labels or highlight some things in the image before actually saving it in your computer.
Snipping Tool Screenshot
Putting Labels on image in snipping tool - image by MZtech
 
You will be then asked to save the captured image and you're done. Your saved image can be found in your Pictures Folder.
 
So why download additional / 3rd party open-source applications just to capture a portion of your PC screen when there's a tool already available in your computer? It will help you save space on your disk and could avoid you from downloading applications that are infected of Malware and Bloatware ads.
 
Have you tried this tool? How do you find using it? If you have any questions, feel free to post your comment below and if you find this post helpful, please click on like or share buttons.


Widgets

Manually Download Windows Updates


How to Manually Download and Save to PC Windows Updates


Windows updates is very essential to our Windows Operating System. It ensures our system performance and fixes bugs and errors. Every now and then, new updates are delivered to us bit by bit. But every time we reinstall our operating system, we have to re-download all the updates from the beginning and it is more or less 800 MB to more than 1 GB data to download.

As a computer technician, there are times where I install new Windows Operating System to a number of computers in a day and downloading all the updates on each and every computer is very consuming on time and Internet Data. Being able to download and save all the updates in advance so I wouldn't need to re-download everything is such a great relief.
 

Windows Updates Downloader Tool

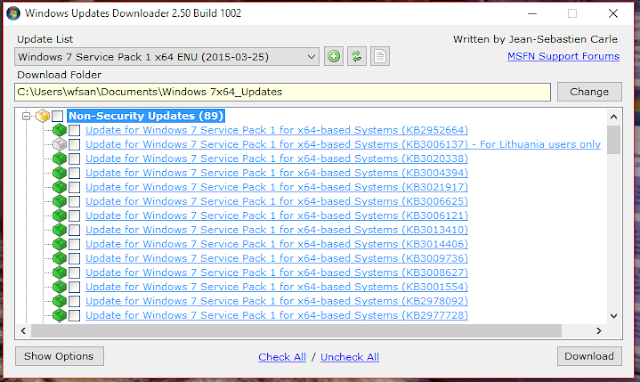
With Windows Updates Downloader Tool, you will be able to download all the updates and save it to your computer and directly install it to a computer with newly installed Windows Operating System. This tool is very easy to use and faster download speed.

Windows Update Downloader Tool Screenshot
Windows Update Downloader Tool - image by MZtech

You can download updates for Windows XP, Vista, 7, 8 and 8.1.

VISIT Windows Updates Downloader Official Website.

Download Windows Update Downloader Tool by Clicking the link Below.


CLICK HERE to select which Windows Updates you will download.

How To Use Windows Update Downloader Tool:

  1. Download the Windows Updates Downloader Tool.
  2. Install the application.
  3. Select which updates you would like to download in the Updates lists and click download.
  4. Double click on the file you have downloaded from the updates lists. (.ulz file format)
  5. Launch the Windows Updates Downloader Tool.
  6. Tick the box of updates you want to download.
  7. Click download button.
If you have questions feel free to post your comment below and if you find this helpful, please don’t forget to click on like or share button.

Have you tried this tool? What do you think about it?


Widgets

Is Your Computer Compatible for Windows 10 Upgrade?


How to Manually Verify If Your Computer is Compatible To Upgrade to Windows 10

PC Windows 10 Upgrade
Windows 10 Upgrade - image by MZtech

Before we all get too excited with Microsoft's great offer of upgrading to Windows 10 for free, it would be better that we check first if our computer is compatible and will run with no problems.


In doing so, we have to check on two things:

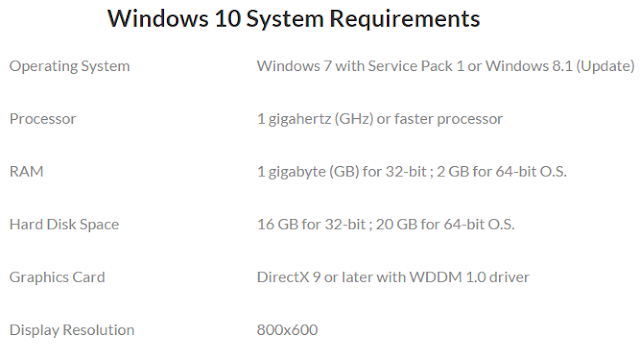
  1. Windows 10 System Requirements.
  2. Computer Manufacturer's Website.
  3. Windows 10 upgrade tool scans and checks our computer if our system is compatible before it downloads the upgrade.

How does it work?

When you click on the Windows icon that appeared on your taskbar, you will see an option to reserve your upgrade. After clicking reserve, you will see an option "Scan your PC". It will then check if your computer is compatible for the upgrade by checking if your system meets the requirements.

Windows 10 Upgrade System Requirements


After verifying that your computer have met the Windows 10 System Requirements, we need to check with our Computer's Manufacturer if it says that your specific computer model have been tested and verified eligible for the upgrade.

Why do we have to verify with the Manufacturerand how do we do that?

The Windows upgrade tools shows that our PC is compatible for the upgrade, so why do we have to bother checking with the Manufacturer? As you notice with the Windows 10 system requirements, it is similar with Windows 7 system requirements. So basically, any computer that can run Windows 7, is capable of running Windows 10 too but it is not an assurance that it can handle all Windows 10 features and will not encounter issues.

Commonly, the issues encountered by some computers after upgrading to Windows 10 is caused by driver problems. For example, display screen flickers after the upgrade. We would think something is wrong with our graphic card but actually it is just driver issues. Driver update compatible to Windows 10 isn't available yet. In that case, there are no other option but to roll back to the previous O.S.

The easiest way to verify regarding our drivers' compatibility, is to check with our Computer Manufacturer Support Website. Check on the website for your computer model and see if it has been tested and verified eligible for the upgrade.

Drivers and updates for your specific computer model can be found on support and downloads section of your manufacturer's website.

If you have questions, feel free to post a comment below.

Widgets

How To Install Android Games and Apps In Your Pc


Play Your Favorite Android Game On PC

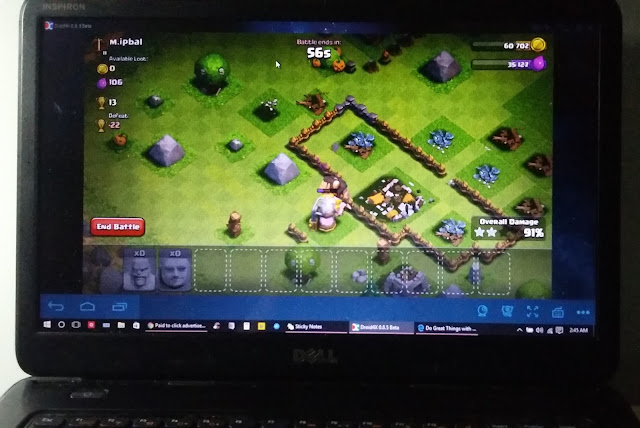
Droid4x screen shot in pc
Droid4x Screenshot - photo by Mztech
 

Installing Android applications and games in your PC is possible. You will be able to play your favorite Android games on a bigger screen and can even use your computer's mouse for easier navigation and controls.

All you have to do is download an Android emulator application, install it in your PC, and run the application. You will be asked to log-in Gmail account so you could access the Play Store and start downloading your desired applications.

Widgets

(SOLVED)Dell Black Screen 3 Beeps In Windows 10 Upgrade

Windows 10 Upgrade Killed My Dell Inspiron 3520

Dell Inspiron 3520

Windows 10 Killed My Dell Inspiron- Photo by MZtech


After I upgraded to Windows 10, every thing worked fine at first. But after it installed a couple of updates, I restarted my PC and it won't boot up. The power light indicator lights up but no Logo screen or Bios.  I turned it off and turned it on again, it is still on black screen and this time it is beeping with 3 beeps simultaneously.
3 beeps code on Dell Inspiron means system board failure. I don't believe it is a hardware failure because everything worked fine before the upgrade. It is surely a software issue.


The solution:

  1. Remove the battery and the AC adapter.
  2. Remove all the screws in the laptop.
  3. Press Power button for 30 seconds. (discharge static electricity in laptop)
  4. Open up laptop and remove CMOS battery for 10-30 minutes.
  5. Replace back CMOS battery and screws.
  6. Connect to AC adapter.
  7. Press Fn/F2/F8 simultaneously while pressing the power button.
  8. Repeat step 7 if Dell Logo Splash Screen doesn't appear after 10 seconds.
Inspiron 3520 has not been tested and verified by Dell to be compatible with Windows 10. It has driver compatibility issues in which the system cannot detect the boot drive so in pressing the any of the function keys mentioned earlier, it helps the system detect the boot drive so it could perform the POST and boot to Dell logo screen.

Quick TIP:
In resetting the CMOS battery, you need not to disassemble your laptop completely. After you removed the screw, lift the upper cover near the touch pad and you will see the CMOS battery.
CMOS Battery
Dell Inspiron CMOS battery - photo by MZtech

The solution above will only help you boot up back to Windows 10. But every time you shut down your laptop and turn in back on, you have to perform all over again step 7 and step 8.
If your current bios version is A09 and lower, updating your bios to A10 will solve the issue.

I would appreciate to hear a feedback from you guys if this solution worked for you. If you know some other solutions with this issue, you are welcome to share your idea. If you have questions or need more assistance, feel free to post a comment below.


Read Also:

Windows 10 Computer
Is Your Computer CompatibleWith Windows Upgrade?


Widgets

How to Use Print Screen Feature in Windows 7/ 8 / 8.1 / 10


Do You Know How To Use Print Screen On Your Windows Laptop?


I am certain that everyone who uses a computer knows what print screen is and its purpose. You could find Print Screen Key  (PrntScr) on various type of computer keyboard. But even though almost everyone is familiar with this feature, very few are using it.


Print Screen Key in Computer Keyboard
Print Screen Key - photo by MZtech


"On my experience, when I tried to use this feature by pressing the PrntScr Key on the keyboard, I was expecting a prompt would pop up showing me the screen image and give me option whether to save or discard but then nothing showed up. I pressed it again, still nothing happened. I thought then maybe it was automatically saved in a folder somewhere so I started searching through my files but found nothing. I thought then my Print Screen Key doesn’t work. And since I need to capture my whole desktop window, I began searching for applications to download and install on my computer. Only to learn that I was wrong in thinking that my print screen key isn’t working. It actually works perfectly fine, I just don’t know how to use it and how it works."

How does Windows’ Print Screen feature works?


Windows 7/8/10:


1.) Press PrntScr Key
2.) Launch paint.exe application    paint iconpaste icon
Paint Tool Screenshot
Save captured image in Paint application - image by MZtech
3.) Click on your paint application and press Ctrl and V keys on your keyboard or click on the paste icon in your paint application.
4.) And you will see the image you captured and could choose whether to save, edit, or discard it.


WINDOWS 10:


Print Screen feature in Windows 10 is much more easier. All you have to do is press the Windows Key and Print Screen Key at the same time in your keyboard.


Windows Print Screen Keys
Windows and Print Screen Keys - image by MZtech


Windows and Print Screen Keys on Keyboard
Windows and Print Screen Keys on Keyboard - image by MZtech


Your screen will blink for a second which signifies that it has captured image of your screen. The image captured is automatically saved inside Capture Folder in your Pictures.

It’s very simple, right? So you need not to download additional application for you to use. Aside from saving some space on your disk, you can avoid the risk of downloading application full of bloat ware, ad ware and worse malware.

You might also want to read on my post about Windows' Snipping Tool. It is useful for capturing image of you screen but is more flexible to use because it has some more options.


What is Windows' Snipping Tool 
And How Do We Use It?

Blogger Widgets