Widgets

Facebook Messenger for Windows / MAC / Linux Computer


Facebook Messenger has been a very useful mobile application. It enables us to chat with our Facebook friends without opening the Facebook application itself. Sending chat message to our friends is simple as texting.

Sending a message does not only limit to typing a text message. You can have a voice recording and send it as a voice message.


You can send pictures and videos from your gallery or take a photo/ video right there in the Messenger and send it right away. There are also a lot of wonderful and fun animated stickers (similar to emoticon) for you to choose from.


This great application has a lot of features aside from sending messages. You can create group chats with your friends. You can have free voice calls (WiFi calling) with your friends from around the world. And if you want to see the other person you’re talking to, you can make a video call with your friend.


All these features are Free to use as long as you have an Internet connection (data connection) on your mobile.


Messenger for PC
Facebook Messenger for PC / Laptop / Desktop Computers


If you frequently use a computer to go online, you can download and install an application to your computer to continue using Facebook Messenger.


With Facebook Messenger for Windows / OS X / Linux, you can now receive all your Facebook messages in your computer without the need of opening a Facebook page in your browser.


All features mentioned above when using Messenger mobile application version is also available to use in your computer. This is not an official application and not affiliated with Facebook but it is free to download, install and use this application. If you want to try this application, download links are available below.


Facebook Messenger for Windows


Download Facebook Messenger for MAC (OS X 10.7+)


Download Facebook Messenger for Linux


Widgets

How to Rescue Your Files When Windows Fails To Boot


Save Your Files
Save Files - image by MZtech


If our computer encountered a problem and couldn’t boot the Windows system, first thing we worry about is our important files, reports, documents, pictures, etc. that we haven’t made a backup on other storage like an external hard drive, USB storage device, or on online cloud drive.


Widgets

How to fix itechie A88 7-inch tablet stuck in boot logo


How to Fix iTechie A88 Android Tablet Computer unable to boot up and is stuck in boot logo.

iTechie A88 Android Tablet
iTechie A88 tablet stuck on boot logo - image by MZtech

“I couldn’t determine exactly what caused my Android Tablet to stuck in boot logo every time I turn it on. I haven’t installed any update or flashed its firmware.”


iTechie A88 Android Tablet Black
iTechie A88 Tablet (Black) - image by MZtech

Specifications:
  • Model Name: iTechie A88
  • Product Type: Wi-Fi Tablet Computer
  • Screen Size: 7.0” ; 800 x 480 resolution ; 5-point capacitive touch screen
  • Operating System: Android 4.2 Jelly Bean (upgradeable)
  • Processor: AllWinner A13 1.0Ghz ARMv7
  • RAM: 512MB
  • Device Memory: 4.0 GB NAND Fast Flash
  • Connectivity: Wi-Fi 802.11 b/g/n
  • Camera: 0.3 MP front ; 2.0 MP back with flash
  • Battery: 2000 mAh (milliampere-hour)

Hard Reset:
iTechie A88 recovery mode can be accessed by pressing altogether the power button, volume up (+) button and volume down (-) button. If you can access recovery options, all you have to do is select the reset to factory settings. It could fix “stuck in boot logo” issue.
“I tried accessing recovery mode but it boots directly and stops at logo again. If you are unable to access the recovery mode like me, you need to flash the stock firmware image to the device in order to fix it.”
Flashing Firmware:
Things you’ll need:
  1. Firmware image file
  2. LiveSuit v1.11 application for your flashing tool.
Download iTechie A88 firmware:
To make sure you download the correct firmware version for your Android tablet, check on the motherboard number /build number. Unlock download link below.
iTechie A88 motherboard
iTechie A88 motherboard build number - image by MZtech


How To Flash Firmware:
  1. Run LiveSuit application and click yes on whether or not to enter upgrade guide.
  2. Select General Upgrade Mode.
  3. Select Yes on Whether to select new image file.
  4. Browse and select the downloaded firmware image file.
  5. Make sure your tablet is off before connecting to PC.
  6. Connect tablet to Computer with USB (Universal Serial Bus) cord.
  7. Press and hold Power button and volume up (+) button.
  8. Release buttons once connection is detected by LiveSuit application.
  9. LiveSuit Flash Tool
    LiveSuit application flashing firmware - image by MZtech
  10. Flashing will start right away.
  11. Flashing will take a couple of minutes. Secure your USB connection to make sure your tablet doesn’t disconnect while flashing to avoid error.
  12. LiveSuit Flashing successful
    LiveSuit application flashing successful - image by MZtech
  13. You will see a prompt if the flashing process finished successfully.
  14. You can now boot your tablet by turning it on. (Note: first boot after flashing may take a little longer than usual.)
  15. The default language is in Hindu. To change it to back to English, go to settings –> select Language & input (letter A icon) –> select the very first option in the selection on the right side –> scroll down to find English and select it. ( change also the input language of your keyboard).
Your iTechie A88 Android tablet’s “stuck on boot logo” issue is successfully fixed.
Did this solution helped you? Please let me know by providing your feedback below. If you find this post helpful, don't forget to hit like or share buttons.

Widgets

Oppo Joy plus (r1011) stock Firmware


If you’re looking for Oppo Joy Plus (R1011) stock firmware / stock ROM, download link is provided below and learn how to use these downloaded file.
oppo joy plus r1011 mobile phone
Oppo Joy Plus (R1011) - image by MZtech


Where Can You Use Oppo Joy Plus Stock Firmware?

  • Fix Oppo Joy Plus phone that is stuck on boot logo.
  • Factory reset
  • Update firmware through recovery mode.
  • Fix other performance issues on phone related to software.

How to Use Downloaded Firmware File?

  • Flash it through recovery mode.
  • Flash it using SP Flash Tool.

How to Flash Through Recovery Mode?

  1. Download Oppo Joy Plus R1011 stock firmware / ROM .zip file.
  2. Save the downloaded file in micro SD Card of your Oppo Joy Plus phone.
  3. Enter recovery mode by turning off your phone, remove and re-insert battery, then pressing power button and volume up (+).
  4. Select update from SD card then browse the saved firmware file in micro SD card and select it to start flashing.

How to Flash Using SP Flash Tool?

  1. Download Oppo Joy Plus R1011 stock firmware / ROM .zip file.
  2. Extract the downloaded .zip file.
  3. Download SP Flash Tool.
  4. Run SP Flash Tool and click on scatter file. (scatter file is located in the extracted .zip file of Oppo Joy Plus firmware)
  5. Click on Download button, turn off your Oppo Joy Plus phone and connect to PC with USB (Universal Serial Bus) cord while pressing and holding volume up (+) button.
  6. Wait until flashing is done and you will see an OK pop-up from SP Flash Tool.
  7. Turn on your phone.

Download Oppo Joy Plus R1011 Firmware

R1011EX 11 A.02 - is the original stock firmware that comes with the device's factory state.

R1011EX 11 A.07 - is the stock firmware update.


Oppo Joy Plus R1011 firmware provided above is a stock firmware on a latest version – EX 11 A.07 and can be use to for updating firmware.
If you have some questions, feel free to post in the comment section below.

Widgets

How To Download Windows 10 ISO File


How To Download And Save An ISO File Of Windows 10 Operating System


Windows 10 upgrade will automatically download in your computer's Windows update as soon as you confirm your upgrade reservation in Windows upgrade tool. It will be automatically erase from your computer as soon as the upgrade is done. So if you would like to save a Windows 10 installer file in your PC for future use (clean install, re-install, upgrade other PC, etc.), you need to download an ISO file of Windows 10 on your PC.

Windows Media Creation Tool
Windows Media Creation Tool, Windows 10 Download - image by MZtech

Steps on How to download Windows 10 ISO file:


  • After downloading the .exe file, run the application. On the selection "What do you want to do?", there are two choices: Upgrade this PC now and Create installation media for another PC. Select on the second option and click next.


Windows Media Creation Tool
Windows Media Creation Tool, select create installation
media for another PC - image by MZtech


Windows Media Creation Tool
Windows Media Creation Tool, select language,
edition, and architecture - image by MZtech
  • Select English for the Language. You have to choose which edition you would like to download. If you would upgrade Windows 7 Starter, Windows 7 Home Basic/Premium, then you have to download Windows 10 Home.
Windows 10 Home
Windows 10 Home N
Windows 10 Home Single Language
Windows 10 Pro
Windows 10 Pro N
 
 
On the architecture, you have to choose if it is for 32-bit (x86), 54-bit (x64), or both.
Windows Media Creation Tool
Windows Media Creation Tool, select file type - image by MZtech


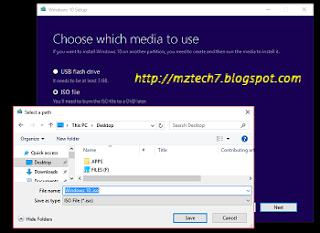
  • You have to select what type of Windows 10 file you would like to download and click next.  
 
  • Choose where to save your file. You can rename it to easy identify your downloaded file then click save and next.
Windows Media Creation Tool
Windows Media Creation Tool, choose location where
to save download file - image by MZtech

  • Your Windows 10 .ISO file will start to download and it will take some time depending on your Internet speed. File size is approximately 2.5 GB-3.5 GB for single architecture and around 5.9 GB for dual architecture (combined x32-bit and x64-bit).
 
If you like my post and find it helpful, please hit like or share buttons. Have some questions? Feel free to post it on comments below and I'd be willing to help you out.


Widgets

How To Fix Invalid IMEI / NVRAM Error


Invalid IMEI / NVRAM Error After Flashing With Stock Firmware

After Flashing a MediaTek Android device with its firmware using SP Flash Tool, one common issue we usually meet is having an invalid IMEI which makes our device unable to connect to cellular networks as well as Wi-Fi networks. To fix this, we should fix our IMEI number by manually entering the number to the device using MTK Droid Tool.

 
Device:
 
Android MediaTek phone (ex: MT6575, MT 6572, MT6588, MT6589)
 
 
Process:
  • Full Wipe Data and Hard Reset in recovery mode.
  • Flashed firmware using SP Flash Tool.
 
no network
Invalid IMEI , No network connection - image by MZtech
 
Issue:
  • No network connection - error message "Unable to register network, please try again later".
  • Wi-Fi unable to connect - error message "Invalid NVRAM".
  • Dial #06# result - IMEI Invalid.  
  • Sim Settings is grayed out.
 
How To Fix:
  • Copy to notepad the IMEI (International Mobile Station Equipment Identity) number found at the back of your device.
IMEI Number
IMEI - image by MZtech
  • Enable USB Debugging in your device.
  • Connect your device to your PC through USB.
  • Root your Android Device and reboot. You can use this Android Rooting Tool.
  • Download and Install MTK Droid Root & Tools v2.5.3. Right click to MTK Droid Tool application and run it as administrator.
 
MTK Droid Root and Tools Screenshot
MTK Droid Root & Tools Screenshot - image by MZtech

  • Click Root button in MTK Droid Tools. (If successfully rooted, yellow box will turn green.)
  • Click IMEI/NVRAM button and put the IMEI number you have copied earlier and click apply.
  • Reboot device for changes to take effect.
  • To verify if successfully fixed, dial #06# on your device to check for your IMEI number.
  • Check for you network connection.
 
If you find this post helpful, don’t forget to click like or share buttons. If have some questions, post it in comments section below.

Widgets

How To Use Microsoft Office Applications


What are the different Microsoft Office Applications and How to use them?


Microsoft Office Logo
Microsoft Office - image by MZtech

There are 7 Applications included in Microsoft Office but only 3 of them are commonly used. The other 4 Applications are seldom used by consumers mainly because they didn't how to use it and where to use it for.

Microsoft Office Applications That Are Commonly Used:

Microsoft Word Logo
Microsoft Word
- Document and Word Processing Software.
- used to create different types of documents like Word Document (*.docx), PDF - Portable Document Format (*.pdf), webpage (*.html), single webpage (*.mhtml), Plain Text File (*.txt), Rich Text File (*.rtf), XPS and XML Document (*.xps, *.xml), etc.
- it used to make Reports, Letters, CVs, Resumes, Newsletters, Planners, Lesson Plans, Test Papers, Graphs, etc.
Microsoft Excel Logo
Microsoft Excel
- Spreadsheet Software.
- used to create documents like PDF - Portable Document Format (*.pdf), Excel Spreadsheet (*.xls), Comma-Separated Values - CSV (*.csv), Text Document (*.txt), Webpage (*.html), etc.
- It is commonly used to create Forms, Inventories, Expense Reports, Budget Reports, Memos, Time Sheets, Grade Sheets,  Schedules, Statements.
Microsoft PowerPoint Logo
Microsoft PowerPoint
- Slideshow Presentation Program Software.
- used to create files such as PowerPoint Presentation (*.pptx), Image Files (*.png, *.jpeg, *.gif, *.jpg, *.bmp), Windows Media Video (*wmv), PowerPoint XML Presentation (*.xml), XPS Document (*.xps), Portable Document Format (*.pdf).
- PowerPoint Application can be used to create Slide Show presentations, edit Graphics, create Photo Albums, create a Movie, create Quizzes, and make Animations.


Microsoft Office Applications That Are Rarely Used

Microsoft OneNote Logo
Microsoft OneNote


- is a computer program for free-form information information gathering and multi-user collaboration. It gathers users' notes (handwritten or typed), drawings, screen clippings and audio commentaries. Notes can be shared with other OneNote users over the Internet or a network. - source Wikipedia
Microsoft Outlook Logo
Microsoft Outlook

- is a Personal Information Manager Software.
- often used mainly as an email application, it also includes a calendar, task manager, contact manager, note taking, journal, and web browsing.
- Microsoft Outlook can be used to manage all your email accounts from different providers like Gmail and Yahoo mail in one place.
Microsoft Publisher Logo
Microsoft Publisher

- is an entry-level Publishing Application Software.
- it can be used to create / design Brochures, Business Cards, Banners, Post cards, Certificates, Flyers, Catalogs,  and many more.
Microsoft Access Logo
Microsoft Access

- Database Management System.
- it used to store / edit data that can be used with programs such as Microsoft SQL Server, Oracle, and Sybase.

 
If you have Microsoft Office installed in your Computer, you can find all these applications present. You don't need to download additional software applications to create certain files or documents because mostly it can be done with these applications.


Read On:

How To Use Print Screen in Windows 7 / 8/ 8.1 / 10

Use Snipping Tool To Capture Image On PC Screen

If you like my post, don't forget to click on like, +1, tweet, Pin, and share buttons. Have some questions you would like to ask, post it on the comments section below.


Widgets

Download Faheem Anjum Android Tool Application


Android Tool created by Faheem Anjum is a very useful tool to repair problems in an Android Phone including Touch Screen issues.


Android Tool
Android Tools v1.1 by Faheem Anjum - image by MZtech

This Android Tool is created by Faheem Anjum is distributed freely for users who needs to repair their phones. In order to use this tool, you have to make sure that ADB (Android Device Bridge) USB (Universal Serial Bus) connection is enabled in your device.

You can do a lot of things using this Android Tool:

Check Device – in checking your device, you can get information of your device such as Model Number, Android Version, Build Number, CPU info, partitions info, and modules info.

Wipe Device – you can erase everything on your device and reset it back to its factory state.

Script Tools – you can download a dump copy of your device’s script, edit script, and inject it back. You can fix LCD positioning, Inverted Touch Screen, and Inverted Camera.

Fix Touch Screen – if your touchscreen isn’t working after flashing a ROM / firmware, this option is a great help to fix your Touch Screen to working state.


Fix Touch Screen
Android Tools Fix Touch Screen Feature - image by MZtech


Fix Camera – just the same as your touchscreen, if your camera isn’t working correctly after flashing, Camera Fixer will help you fix the issue.

Combo Fixer – is a collection of the Original Back Up Hardware driver such as LCD, Touch Screen, and Camera in a specific tablet model. This Combo Fixer can fix shifted LCD, Inverted Touch Screen, Inverted Camera in just 1 script injecting.

RockChip Tool – a tool to flash an Android device that has RockChip chip set.


MTK Auto Rootuse this tool to root Android Device with MediaTek processor chip set.

Phoenix Suit – use this tool to flash an Android device with Spreadtrum processor chip set.


USB Driver – use this to install Android USB driver in your computer.

I have used this tool and it helped me in successfully fixing my Touch Screen issues in my Android Tablet after I have flashed a firmware.

If you want to try it out, all you need to do is download this application, install, and run this application as administrator in your PC.

You can download Faheem Anjum’s Android Tool v1.1 from the link below.


If you have tried this application, let me know what you think about it. And if you have some questions, feel free to post on comment section below.

Read this Blog:

A13 Android Tab - Touchscreen Not Working After Flash
How To Identify Firmware Of A Dead China Tablet PC

Blogger Widgets